Monday, March 26, 2012

New ink and I hope St. Louis is ready, cause I'm here.

Well first I have got to begin with the new addition to my body.  An awesome tattoo on my ankle paying tribute to my passions!  I am a little in love with it.  Deb and I were talking about seeing a movie, then I joked and said we could get tattoos instead.  Well the movie didn't seem that interesting so we got tattoos instead.  We got our last tattoos after a similar conversation and nothing good playing at the multiplex.  

We've gotten all of our most recent work done at Ben Around Tattoos in Waynesboro, VA, and they've all been done by Shawn.  He fit us in last minute, came up with beautiful artwork for us and said the nicest think we had ever heard a man say about his wife.

Deb: "What Does your wife do"
Shawn: "She's compassionate.  She goes out of her way to help others."

It was a pretty incredible thing to hear a husband say about his wife.  We welled a wee bit and not from the pain.

***I would also like to have a side bar and say that I though getting Tattooed on my ribs was like the worst of the worst, but that honor had to go to the inside of your ankle.  HOLY CRAP! It hurt.  I decided after the shading that I didn't need color at this time.

Long story short, I have been so bad about posting but you'll have to forgive me.  The last couple weeks were full of packing and getting ready to leave for St. Louis.  After Almost 14 hours in a Prius (way good choice for a road trip) I arrived last night in St. Louis with my dear friend and co-worker Kelsey, in tow.  Hooray!

Here is our Journey, in images:

 The mornin' was super misty, foggy, and rainy. Boo!


The lovely and luscious Kelsey, who affectionately offered to drive me to STL.  Woh! She's Awesome.
Clearly on this trip I discovered instagram! Its super great!


Lewisburg, WV was named the #1 small town US.  They had a plaque.

Kelsey loves eating Nori just like my sweetie pie, awe Deb I miss you!

West Virginia is BEAUTIFUL!


This is me relaxing like a Princess, in Princess, KY!

Here we are bringing the Sunshine to Clark County, KY.  
Conversation with the clerk at the Clark County, KY, gas station.

Clerk: "You girls aren't from here."
Me: "No we're not how can you tell."
Clerk: "You actually seem happy."
Me: "Oh is that out of the ordinary?"
Clerk: "Yah."
Me; "Well, happy to bring the sunshine, have a great day."


Indiana Pistols! We didn't see a welcome sign.

Yeah that's a goat in the back of that truck.

Kisses for Deb!

This was in the bathroom at a rest stop.  Looks dicey to me.


Again there was no sign for Missouri, but hey, Welcome to Missouri!


I got bored and camera happy.

WE MADE IT!!!

You are probably wondering, what was Deb and the puppies doing when you were tripping around the midwest.  Well here are the photos that deb sent me of the puppies:


Orson Baby! on his bed

Hobbes so sad I'm gone.

Orson looking for me.

Blue Bear and his crazy eyes!

Our delicate boy on his bed.

Sweet boys.

She Loves ME!!!

On sunday after our long day in the car we wanted to do something fun.  We were going to go to the Zoo.  The traffic and parking was such a situation that all we saw was this statue honoring the Zoo.

Our treat for Kelsey and my last night together!

Yay Blue Moon.

It was a great trip, but now I have to get going and be ready for work.  Till Later, Posting soon.

~ Caroline ~

Thursday, March 8, 2012

Grammy gets new duds, a perfect A-line skirt.

The last time Deb and I visited my Grandma she fell in love with a skirt I had made for Deb.  I thought for sure that she liked the cut or perhaps she was just being nice.  However she kept fawning all over it from the bold pattern to the cut.  I told her that absolutely she must have one of her own if she loved it so much.  

I took her measurements and set to work.  ***I want to lend a disclaimer, my Gram is a super tiny woman.  She'd be lucky to weigh 85 lbs. soaking wet.  This thing is going to come out really small, so no complexes ok?  Great me neither.


You are going to need the following measurements:

  • Natural Waist
  • Distance from your Natural Waist to your High Hip
  • High Hip
  • Distance from your High Hip to your Low Hip
  • Low Hip
  • Natural Waist to Below Knee 

I love my L-shaped ruler, and it is a great help in this particular project.  It helps you to make nicely squared lines.  Most women like to wear their garments at the high hip line and that is where I measured from.

Draw a long vertical line, which is the length of the high hip to below knee.  ***To get that measurement subtract "Distance from your Natural Waist to your High Hip" from "Natural Waist to Below Knee".  At the top of the vertical line you are going to draw an adjacent horizontal line.  The length of the horizontal line is 1/4 of the total High Hip measurement.


Next is to measure down "Distance from your High Hip to your Low Hip" and to create another adjacent  horizontal line.  This will measure 1/4 of your "Low Hip" measurement.  Next we play connect the dots drawing a line diagonally through the ends of the horizontal lines we've already laid in.

Grammy being so slim this gave way to a very shallow diagonal and thus reduced the skirts fullness.  So I kicked it out and and gave the pattern a little more width at the hem.

I would like to take a moment for seam allowances.  When you work from most patterns you can purchase the seam allowance is factored into the pattern for you.  It is extremely rare that I put seam allowance on my paper pattern.  The reason for this is that I prefer to mark the edge of the pattern, and then using a clear ruler mark the seam allowance from that.  I find that it makes it easier to change my seam allowance as needed.  I always use 1" seam allowance (SA) on mock ups and new patterns.  It is always possible to cut a little more away than it is to put it back.


***I like to put the measurements I am working from directly on the pattern.

You will need to either cut your pieces on a fold or mark one half then flip it over to mark the second half.  I was matching a pattern and that was why I chose the mark and flip method.


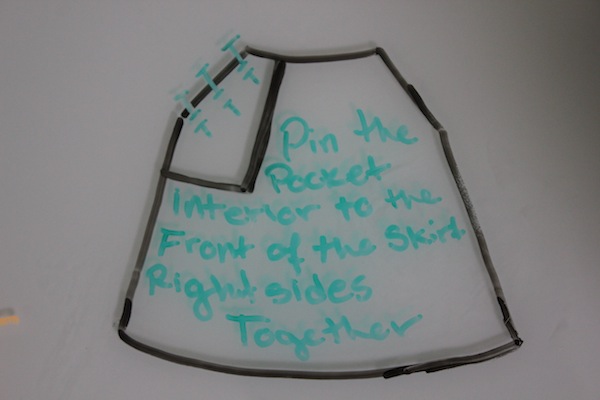
The pattern I did for Gran had pockets in it which are optional on your a-line.


I do not have access to a serger at home so rather than leave my edges raw, I used a pair of pinking sheers to cut the edge.  This helps to stave off fraying.

You are probably saying to yourself, "Where was Deb while you were slaving away there Caroline?"  Well I will tell you.  She was on the daybed with a kitten in her lap.  Relaxing!  I would like to say that this is hard to believe, but as you've seen in previous posts, this is a common reality.


Here is a quick little pocket how to in pictures:


***I am going to do a further post on pockets a little more later.

The next step is to sew up your side seams.  If you have added the pockets you are going to want to either pin them in place or sew them in place in the seam allowance.  Once you've stitched the side seams you want to press them open.


You are going to seam your waistband to the top of your skirt.  The waist band is going to be similar to how we did the roll hem on the curtains, the exception being that rather than just rolling what is already there we are going to seam a strip of fabric, cut along the width of your fabric.  this strip should be 4X the width of what you want the finished waist band to be.  For example if you want a  1" waist band your strip will be 4" wide.  Right sides together matching the strip up with the top of your skirt you need to seam it at the width of your finished waist band (for a 1" waist band you would seam at 1").

Now press the waist band up toward the seam allowance and then once more over the top of the skirt.  Next you will press the remaining 1" up an into the crease of the fold just like the roll hem and topstitch.


We will now put on our zipper.  I am using an invisible zipper, (How to on the Burda Style website).  You can always follow the directions that come with your zipper.  I have an invisible zipper foot for my machine and let me say it was worth the investment.


*** Be very careful that in sewing your zipper on you do not  twist it.  This will cause it not to zip, you will have to take it out, and you will feel foolish.

Your final step is to do a roll hem at the bottom edge of your skirt.  I used a half inch roll hem, which means there was actually 1" of hem.


Finally press and then you are finished.

New Skirt Pistols!


~ Caroline ~

Projected Forecast
1) Tablet Case for Deb
2) Blouse pattern for me
3) New dress from Vintage Vogue

Thursday, March 1, 2012

Curtains, Really? Now that's Love...

For those of you who don't know, I work at an interior design firm as a seamstress.  We do lots of things there, curtains, cushions, pillow and my favorite slip covers.  Now of all of those things that we make curtains are my least favorite.  To me they just lack the complexity I love in slip covers.

That all said while making over our guest room to be an office for the love of my life, what did she say the office would need? Why new curtains of course, custom by yours truly.  ERGH! My response, " Of course, I love you, I will gladly do the thing I loathe doing all week long on my weekend off."  Ok, so the last half of that was in my head, but the first half was the important part.  I do love her and of course I was going to do it regardless.

Naturally it was a great topic for a blog post.  These are just simple rod pocket curtains.  We got the fabric at Ikea.  I bought 5 yards and I used every inch of it.  The curtains I made went from a rod above the window to the floor and it measured 86".  When making a set of drapes I like a panel for each side, it makes the curtains full and pretty.

Here explicitly is what you need in terms of fabric lengths and measurements.  

Your total length rod to floor: 86" for me
Hem depth: 4"(this is actually going to mean 8" extra on your fabric, but we'll get into that shortly)
Rod pocket depth: 2" (Like above this is and extra 4" to the finished length.)
Total fabric length: 98"
Width: My windows are relatively standard so I used one width of fabric for each panel, for larger windows you'll need to increase that.

The first step is to remove your selvage edges.  On cotton fabrics, especially the home dec weight you can take a shortcut.  A lot of people would tell you not to do what I am advising, but a lot of people are up tight about their sewing.

You cut a small length along the selvage where the white meets up with the pattern.  Hold the selvage in your right hand, the pattern in your left, and let it rip literally.  Pull them apart and tear the selvage right off your fabric.  It makes a noise that is fantastically satisfying when intended and absolutely horrifying when it is unintentional.


Now that your fabric is all tore up it is time to put in your hem.  This project is going to have a series of rolled hems.  Normally when I do curtain hems I like a 4" wide hem, that means 8" total will be devoted just to the hem. My fabric was just a wee bit too short so I have to shorten my hems.  I only had 92" for my curtains total. My bottom hem was only an inch to allow for two inches for my rod pocket.


Using your chalk or marking pen I like Clover Tailor's Chalk, draw a line four inches up from the bottom of your fabric.  ***Be careful, if your fabric is directional, make sure that you put the hem on the right end on both panels.  I made that mistake on these very curtains and had to fix it.  I forgive me, the pattern was confusing and I was sick.


First press the edge of your fabric to the line.


Next roll the end of your fabric under so that your raw edge sits inside the crease you just ironed in.  Press the newly folded edge.  If you have access to a blind hem machine this would be a phenomenal time to use it, but more people don't and I only have one at work. Since the hem is one inch, I pinned on the face of my fabric and topstitch 7/8 ths of an inch from the edge, on the face of the fabric.  You could stitch this by hand but it would take a while and I did not have the patience to do so.

You are going to mark and roll the side hems next just like you did with the bottom hem, also at 2".  The difference is that at the corner is going to be turned in and pressed like I have shown here:


I followed this turned corner by finishing the turn of the side hems. Last mission on our delightful side hems is to pin on the right side of the fabric and to topstitch 7/8 ths of an inch from the edge.

One turn                                                              Two Turns

                                                             Final Press                                          Pinned and ready to Topstitch

As is usually the case I couldn't get by without a little help from my friends.  Orson the wonder-pup was inspecting the hems, making sure they were even.


One of our other puppies (we have four) Hobbes was lending his wizened eyes to the project today.

My pep talk.

What would this blog be if I neglected to chime in on what Deb was doing to aid the progression of this current project.  She mostly just cuddled some puppies and through me some curtain making pistols, while making some of her famous faces.  My wife ladies and gentlemen:


***I always craft under attentive and proper supervision***

We are nearly there, all we have left to do is complete our rod pocket.  Now if you remember from the top of the blog, our rod pocket is a finished 2" rather than 1".  Once more we are going to roll the fabric just like are other three hems.  We are also going to topstitch this hem but instead of stitching at 7/8 ths of an inch, you will stitch it 1 and 7/8 ths of an inch.

Once you've topstitched this last hem you'll have created this delightful pocket threw which you will put the curtain rod. Hence the name "Rod Pocket".  Genius I know!

Then...Voila, beautiful curtains!


~ Caroline~

Projected Forecast (ok like nothing has gotten done, didn't I already say I was sick?)
1) Grammy's Skirt
2) Tablet Case for Deb
3) Blouse pattern for me? or new bag, ooh conundrum!