Monday, February 27, 2012

Deb's New Office, AKA Deb gets her braun on!

While out to dinner the other night, I was expressing to Deb how much I LOVE my new studio space and how I can't wait to get home and to work every evening.  This incited some sarcastic banter where she said how it must be really nice to have your own space in your own house.  I countered with a resounding yes, it is super awesome!

In all seriousness I told her that I wanted her to have her own office.  She didn't believe me, she thought I was trying to tell her one thing but imply another.  Contrary to what she thought, what I say I actually mean.  After some serious convincing she got giddy as a school girl over the idea of having her own office.  Now the only thing left to do was get to work.

It all began with a trip to Ikea.  Before I go any further I have a few things to say about Ikea.  Ikea seems to be like what having a baby must be like.
Step 1) You get it in your head to add to your life and home.  There is excitement. (dream your new space = dream your new baby)
Step 2) You put in a little effort to make it happen (drive to Ikea = have the sex/insemination.  There is still excitement, you are on your way.)
Step 3) The new addition to you home begins to feel real and you start to visualize what is about to enter your life. (Walking the showroom = seeing your baby on a sonogram).
Step 4) Pain and worry intensify (Collecting everything you need from the self-serve section, yes you have to lift it and put it all together = Labor begins).
Step 5) You push, pull, and it is exhausting. (getting the crap from Ikea into your car, then into your home = Labor intensifies).
Step 6) You put in your las bit of strength and energy to accomplish your mission. (Putting together what you worked so hard to get from Ikea = The baby crowns you push and it is born).
Step 7) You look at your beautiful prize and the effort of all you hard work in awe and amazement (Stand back and admire your new furniture = Admire your new baby)
Step 8) Forget the pain of everything you just went through, begin to think of what you want next time (What room will I decorate next = what will we have next time)

This lovely little room was originally Deb's office and I can't really remember why but eventually we moved her furniture out and the room sat empty.  As empty rooms often do it began to collect stuff.  It started slowly, but then my mom sent a whole bunch of baby stuff and then we got more baby furniture from deb's sister Susan.  This collection of goods sat in this room just collecting dust.  It looked awful, we kept the door closed and it just became this ugly vortex of things with no current purpose.  Mostly because we have no baby, and no immediate prospect of said baby.  Long story short, it was an ugly situation.

When we moved the studio from the basement to the guest room, the guest room had to go somewhere.  For a brief moment the guest room occupied this small space.  It was cute but then I decided that Deb needed her space, so once again our small third bedroom would be an office.


Before:


During:
Of course after the fabled trip to Ikea we had some junk to put together.  We bought some shelving that was part of the Ivar System and I have a few things to say about it.


The first is the the pegs for the corner unit come in these little tubes.  The were extremely difficult to get out.  It was like trying to get the last sugar our of a spit sodden pixie stick.  Miserable!


We thought it made sense to put the corner unit together first.  Big mistake.  You see the straight shelves have these little pieces where the pegs snap in, where as the corners merely rest on the pegs.  It is EXTREMELY irritating.

We finally got the outer shelves together which was a nightmare in and of itself because we couldn't get them to be square and level.  We took them apart multiple times.

***DISCLAIMER: If your floors are remotely let alone noticeably un-level it is going to make putting these things together absolute hell.  I seriously wanted to punch a baby.


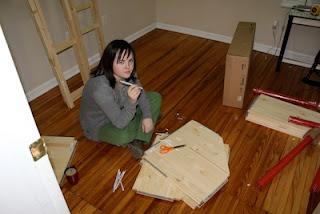
As you can see Deb got seriously to work with this project.  This was most helpful because I was seething with anger at this book case.


Then on top of it all Deb couldn't figure out where she wanted them.  They danced about the rooms multiple times.  When you change the location you have to change the location of the pegs for the corner shelves, so you have to move them every time and we did.


Now that is a good lookin', hard workin', booty!

We also needed a little DIY side table to  optimized Deb's work station.  An extra shelf and for red legs and you've got a table for under $25.


New table pistols!!!


After:
I was not feeling well at all, so after moving a whole bunch of furniture I went to bed.  When I arose.  The office was complete.


The curtains you see pictured were made my yours truly.  The people I work with  know this already, but I have not great love for making curtains.  These went together pretty quickly and will be the subject of my next blog post.  They came out lovely and Deb was so pleased.


With the hanging of the Ukes and the art, it was a done deal and a sweet swag room.  Deb has been enjoying it all day and that makes me so happy.  I am thrilled to have her know the joy I have in my own room.  Ok as I am still feeling super sick, its back to the sick bed. 

~ Caroline ~

Projected Forecast
1) Grammy's Skirt
2) A tablet case for Deb
3) Blouse pattern for me!

Saturday, February 25, 2012

Sexy Bags and Wallets

In the excitement over the new love of my life, my purse, I had to make another.  


I  am so in love with these bags! Naturally when you're in love with something you want to share it and let others enjoy it.  Where do I go when I want to share some crafty love you ask? Why to Pretty Pretty in Staunton, Virginia.  One of the owners Susan, really enjoys my work and she already sells my wallets.  

No big shock, she loved it!  I don't know if she is going to sell it or keep it, she was quite enamored with it.  I have enough of this material left if anyone is eager for one to call their very own.  

Susan also wanted some new wallets because her supply was running low.  I whipped up a wicked batch and brought it right by.  Here are some of the beauties:
  

Susan has these little lovelies at the shop presently. They are looking fabulous!


 Do not hesitate to pop in at pretty pretty to see the wears and all of Susan's gorgeous jewelry.  If any one wants any of my beautiful creations or knows of someplace else that may be interested in selling them, please contact me.   Pretty Pretty is my only location at the moment but I am always looking to expand.

~ Caroline ~

Projected Forecast
1) Grammy's Skirt
2) Tablet Case for Deb
3) Blouse for me!


Friday, February 24, 2012

I AM IN LOVE...with a purse!

I have long been in pursuit of the perfect bag.  When I endeavored to take on the creation of a fabulous purse, big shock Deb wanted to shoot me down.  I have these bags which I really love, Deb calls them my "hobo bags".  She hates them and the last thing she wanted was another "hobo bag" to kick around our house.  So she came up with a bargain.  I could buy new fabric for my fabulous purse of love, if I got rid of the "hobo bags".  DONE.

I've never quite been a purse girl, in fact for a while I was just a wallet on a chain girl, yeah that's right I went there.  I've tried to shop for one, but they're never quite right and the ones I've made seem to look, well hand made.  No crafter wants to be asked if they made their project, they want to be asked where they got it.  I finally found my elusive white stag of a purse and started on a project:


I love Amy Butler and when I saw this bag, well I needed it. After acquiring this book I set to work on the very important task of finding the perfect fabric.  It came to me in a flash when I went down to the basement section of U-Fab (Website and Pinterest)in Charlottesville.  These Koi fish just jumped out at me.


The linen behind it I found in a remnant section for $2.99 a yard.  Can you say deal?  Cause I can and my debit card speaks that language too!


Like so many projects it all starts with cutting out the pattern


Marking the pattern pieces.   One of my pet peeves is when the edge of my chalk  gets dull and doesn't mark accurately.  I have found a chalk I love and I want to share with you all.  I love the Clover tailer's chalk.  It keeps its edge better than any chalk I've every used.


I also have super love for rotary cutters.  My fave is my Gingher Rotary Cutter which is totally fabulous. To my left handed friends out there, these rotary cutters come in lefty as well, yay!


The pattern calls for almost every piece to be fused with woven fusible interfacing.  Since I used home dec weight fabric for my exterior using all that interfacing seemed extreme.  Instead I used fusible fleece on the largest lining piece.


To make sure that the bottom of the bag was really sturdy I used the heaviest weight Peltex interfacing.  If I could have gotten my hands on it I would have used fusible, but alas, I have to sew it on.


Obviously it continues with cutting out all of the fabric and accumulating all of the pieces.  Check!


Double Check

I really loved the way they did the edging on the side pockets of the bag.  The exterior fabric was cut 1" shorter than the lining fabric.  They are stitched together at the top.


The seam allowance was all pressed toward the ling fabric, it our case toward the left.


Then the lining is pressed around the back of the exterior fabric and over the top edge to make it look as though it is simply banded but it actually creates the interior lining for the pocket as well.  AMAZING!


The next step is to pin the pockets to the exterior side panel and to baste it together so that it won't shift when you sew the front panels to the side panels.


I think that some people downplay it but one of the most important parts of sewing is ironing.  Keeping your seams pressed makes your work the best!


I got the bag's exterior all put together and then the next step was to drop in the lining.  With right sides together I stitched the handle of the lining to the handle of the exterior and then turned it right side out.  then all that was left was to turn int the seam allowance of the interior of the handle and to top stitch it.

As you can see it came out F-A-B-U-L-O-U-S!  I am so in love!


In my excitement for the beautiful weather and my beautiful new bag, I needed to take a walk.  I adventured to a new cupcake bakery called Sweet Haus where I met Tara who is one of the owners.  She complimented and loved my bag! It made me feel great! Hoping that maybe Sweet Haus may be a place to display my wares in Charlottesville?  Fingers crossed.

~ Caroline ~

Some of my wallets are available at Pretty Pretty on West Beverly St. in Staunton.  You can also contact me if there's something you like.

Projected Forecast
1) Wallets
2) Grammy's Skirt
3) Blouse for ME!